NOTE: Updated for RX7 and Cubase 10.5 Pro. However, I am lazy and the pics are from RX6!
I am using iZotope RX 7 Standard together with Cubase Pro to help me record and master audiobooks.
Everything being equal, you really should not need any sort of repair system when recording voice-overs professionally. The studio environment should be perfect, the recording equipment should be top-line, the sound engineer should be highly experienced, and the talent should have the perfect voice.
Audiobook Menu
FAQs:
Reading Your Book
Recording Your Book
Editing Your Recording
Technical Questions
Recording your own poetry
Other Articles:
A General Guide
Recording Dirt
Recording My Poetry
Preparing Your Manuscript
Plan your audiobook as you write
Using iZotope RX 6 with Cubase
Editing in Cubase demonstration
A bit on Punch & Roll
Should you delete breaths?
Setting up your Studio
External Articles & Resources
Punch and Roll
But this series of articles I have been writing is aimed at those working from home, possibly recording only their own books, and doing everything for themselves.
Even if you have a really, really good set up, you are producing yourself, and there is no hope you are going to catch every audio glitch while you are also performing your little socks off. That is what a sound engineer would be there for; they worry about all the technical bits from distortion to mouth slaps and have the luxury of concentrating on just those things.
This is not really a review since I am not using every aspect of RX7 Standard and therefore not in the position to give a proper analysis, but rather it is how I am using in my own setup. My Digital Audio Workstation is Cubase Pro (currently at version 10.5), but this is similar to ProTools, Logic and other serious multi-track DAWs out there.
Recording on these larger DAWs is not like recording in a standard WAV recorder where you are effectively creating one file. These systems create a new file (or many files if you are recording on many tracks at once) every time you go into record. In Cubase when you look at the Pool (the file list) you see all of them listed by track name. I give my tracks chapter numbers so my files are 01-OliverTwist-Chap-1_01, 02, 03 and so on. On a long chapter with loads of punch ins, I can easily create 200 files.
However, when you are working on the system, you don't even have to think about it. You just have a multi-track display with all your recordings laid out all nice and neat.
Integrating RX7
So, How do I add RX7 into my system to make the best advantage of it?
RX7 Standard comes as both a standalone editor and as a series of VST plugins that work with Cubase. One of the plugins, RX Connect will get the RX7 editor and Cubase talking to each other. This can be very useful when you are using the Module Chain which allows you to group the various plugins and use them all at once or using something like spectral repair to work on a very sticky issue.
Much of the time, however, I use the VST3 plugins.
My Input/Output chain
First of all, let me lay out my setup from in to out:
- Neumann mic into Focusrite Claret 8pre
- Cubase input channel with a compressor (only very light just to catch my wilder moments!)
- Record channel labelled by chapter - no insert plugins, EQ or other modifications. These channels are routed to:
- Mono Voice Bus. This is where a lot of the hard work goes on including EQ and some RX plugins. This is output to:
- Mono master out. The master channel has a mastering plugin (iZotope Ozone 9) inserted post-fader.
This set up allows me by default to use consistent processing on all tracks and possibly forces me to be consistent in my recording and presentation.
Plugins
VST plugins in Cubase can be used in two ways.
- Inline inserted into a channel as non-destructive live processing
- As a process plugin applied to a particular event or part of an event. (An event is a single recording - so a pretty lump on the timeline)
I am using RX7 in both ways in my workflow.
The Mono Voice Bus
My mono bus is where I do the work of making the voice sound nice. So I have EQ (I use Neutron 3), RX de-ess, and I can also insert RX7 Voice de-noise and RX7 Mouth De-Click if needed. As an aside, I also use the Waves Vocal Rider plugin on this bus which will ride the levels up and down a little (ignoring breaths) rather than trying to sort out uneven levels with a compressor. Using a compressor to sort out level problems is VERY BAD PRACTICE!
RX7 Voice De-Noise
I must say I have been rather impressed with this. There are three ways of getting rid of background constant noise.
- Insulate your booth properly - the best way.
- Use a gate - NEVER do it this way! Gates are for creating nice slappy snare drums, not getting rid of background noise on voice tracks.
- Use a de noise plugin. The good compromise.
The RX7 voice de noise is one of the best out there. If your noise problems are very low level, then this will work a treat without you hearing it working. But as the noise gets louder, you will hear it working, and that is not good. Insulate your booth better!
RX7 De-ess
I am getting older and my teeth are not what they once were, so I do get the odd sibilance problem that slips through while I am in mid-hand-waving acting mode.
Cubase actually has a very good de-esser built in, but I found this RX plugin a little more subtle which suited me.
I normally have the threshold set a little lower than the image below, but I was messing around with it. I do save presets on all of these plugins and other Cubase channel settings by the way - all called "Book something" so they are easy to find.
Although the setting will not get rid of dreadful sibilance, it does take away a little, so I run this as a live plugin on my voice bus.

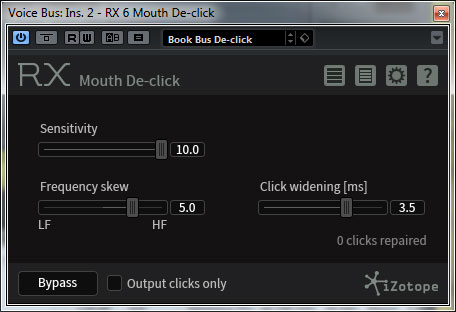
RX7 Mouth De-Click
This is a much better plugin than their previous De-Click for this kind of work. I use it in the chain here to catch some of those tiny little clicks. For any heavier clicks, I use the plugin in process mode just on that particular little portion of audio (see below).
Waves Vocal Rider
I have now added #achieving-perfect-vocal-levels-with-vocal-rider" target="_blank" rel="noreferrer noopener">Vocal Rider to my voice bus which is at the end of the chain.
This plug in emulates a sound engineer raising and lowering the fader during quiet or loud sections. It is something we always did in the studio. This is NOT compression or Limiting! It also recognises breaths and does not raise them. A clever plugin. You can overuse it and it works best when used subtly.
Editing
While editing, I am obviously monitoring through the output bus so I am editing in relation to any plugins, like those listed above, and any output EQ and compression. This is important as I do not want to be making changes or solving problems that will be messed up or made unnecessary by later processing. Once I have finished my editing, that is that. The result will be exported ready to be uploaded or used wherever without further processing by me.
Editing, as I have said elsewhere, is a question of both examining every part of the recording for errors, levels, timing and gaps between sentences or paragraphs, and re-recording anything I am unhappy with. Although I do punch in when I make mistakes during the recording, I do not take for granted that the punch in is perfect. In fact, it very rarely is, not to a standard I want. When I was a sound engineer (originally working on tape), I prided myself on being able to find the perfect point and manually punch into record, and could work with regular voice-overs like two musicians, getting the timing and breath perfect. However, I have found this much harder working on my own, and to keep programming up punch in points can slow me down.
With DAWs like Cubase, nothing is destroyed. Each time you punch in you create a new file. If you make several attempts at a punch in, and do not "undo" each time you mess up, you will end up with several versions with only the last version being visible (and audible). The other versions can be accessed by switching on "Lanes" in Cubase, and if you are unhappy with the final take, you can choose one of the others or just a bit from one of the others. Very useful! To be honest, I use this very little for audiobooks. Generally, it is always the final take I use and don't even keep the ones that I am never going to use.
RX7 also now comes into play during editing.
In Cubase, plugins can also be applied as a process. If I select one event (or just a part of an event with the Range tool), I can open a plugin, preview the effect, and process just that section of the recording. Just like with everything else, this is NON-destructive. Cubase keeps a little file (the non-edited segment) so if you need to revert, you can. To be honest, I never have, so off the top of my head, I am not completely sure how to do this - it will be in the manual somewhere!
To make this process quicker, I have assigned key commands to several RX plugins - Mouth de-Click, De-ess, and de-Plosive. I have done these as macros so that it is a single key and after processing, the system automatically winds back a couple of seconds and goes back into play.
If I want to remove a couple of mouth clicks or smacks from a section, I simply select it with the range tool and use the key command. The RX7 Mouth De-Click plugin opens and I can correct the problem very quickly. In fact, I have one setting that I use most of the time so I don't even bother to preview. I open the plugin then press Enter and it processes the part of the event and closes. Done.
I use the de-esser for removing sibilance beyond my global setting and the De-Plosive plugin in the same way. I probably use the De-Plosive the most.
The other plugin is RX7 Connect. If I fire this up, it takes the short section of audio and exports it to the full RX7 editor. Why is this useful? Well, the de-click won't get every click. As the wonderful Don Baarns pointed out the other day, (he is an RX genius and tutor), when a click is very loud, de-click ignores it as it thinks it is an intentional noise. For these, I use Spectral Repair, but that is only available through the editor. Once I have corrected the problem, I hit send back, and it sends the clip straight back to Cubase. I hit apply and it is done. It takes just a couple of seconds.
Mastering
And once I am happy with everything, all that is left to do is output my final edit.
On Cubase, you can create more than one output channel. By default, most projects open with a stereo master, but audibooks are normally mono. Although you can create a mono down-mix on export, this can mess up your levels since it is a combination of left and right. Not helpful.

I create two mono masters. One is labelled ACX Master and is set up with a mastering plugin to conform to the ACX requirements. I have this set as my default master and meter with the built-in Cubase loudness meter.
The other is labelled YouTube master and uses the same plugin. But it is set up to conform to the YouTube loudness requirements instead. The bus feeds into both these simultaneously using the Cubase direct outputs, and I simply choose which output I want when I export.
As the ACX is my default, I use this as the cue send to my headphones in the booth.
I use iZotope Ozone 9 Advanced for final processing. This is a wonderful beast, if a little pricey. It comes with several modules including exciters, compressors, master, dynamic eq (corrects EQ problems related to dynamic processing), and several others. It also has tons of presets and will even suggest settings when it listens to your mix. You can even import a wonderful sounding voice recording and it will analyse it and try to make yours sound similar. Very clever.
Conclusion
I am very pleased so far with RX7 standard. The tools are powerful and useful, though I am not using all of them by any means for this type of recording.
What pleases me most is the transparency. Any plugin, whether it is a repair tool or an effect, should only do what it says it does. It should not break the initial audio in the process. This is particularly true of repair plugins. I have not tried everything out there, but I am very happy how well the iZotope product works and it will be part of my work process for a long time to come, I suspect. I can see why it is one of the most popular professional repair tools out there.


