I have covered some of this before in my article about integrating RX into my workflow, but I thought I could do a more up to date version.
I love Cubase and I love the tools from iZotope as you will see. By the time you buy the plugins this is hardly a cheap template, but it works well.
Note - this template is for both recording AND mastering. When I export a chapter as a WAV, it is finished and ready to send to the publisher or wherever. This means that at the end of the job, I can archive the project and everything I need is there if I need to return.
Routing and Layout
Audiobooks are made up of many chapters, so my template is based around that idea. But it is also important that every chapter is dealt with in an identical fashion. In music, you would EQ and compress drums differently from vocals, so having unique processing on each track is quite normal. But with audiobooks, it is better to put all processing on a group and route all the audio tracks through the one group. So...
Track Folders
I create three folders on the arrange page of Cubase.
Edited - This folder will contain all finished chapter tracks. I have the folder set to locked and all tracks moved to here are both locked and muted for safety.
Recorded Chapters - This folder is for any tracks recorded but not yet edited. In reality, I rarely use this folder, but it is useful to have kicking around.
Current Chapters - This folder normally has only one track in it - the track I am currently recording and editing.
On my project page I also have a Busses folder and an Input/Output folder - these are automatically created.
Tracks and Naming
As this is a standard audiobook, all the tracks are mono.
Input
I only have one input track which is for my U87 mic in my booth. I have two plugins inserted, but I will talk about those later.
Chapter Tracks
The chapter tracks are audio tracks fed with the one input track. I have no processing of any kind on these tracks. I have my own naming convention.
00-NameOfBook-Chap00
In practice, it works something like this:
00a-NameOfBook-Opening
00b-NameOfBook-Prologue
01-NameOfBook-Chap01
02-NameOfBook-Chap02
This means that in my audio folder and in Cubase's Pool, the files are in logical order. I also use these names when exporting. It helps keep everything organised and trackable!
These tracks are sent to the Voice Bus.
(Note - I have my track colours set to "Use previous track color + 1" in preferences. It ends up very pretty!)
Voice Bus
This is where most of the magic happens (other than the voice booth.) This is a mono bus with various processing. This is routed to a mono output bus.
Output
When you create a Cubase project, it normally has a stereo output bus. That is no use here, so this layout has a mono output bus instead. I have my final mastering processing on this bus.
Workflow
The idea of my template is to make audiobook recording and editing as smooth as possible. Everything can be done within the Cubase environment.
My version of the template has four audio tracks added.
00-NameOfBook-Audition
00a-NameOfBook-Opening
00b-NameOfBook-Prologue
01-NameOfBook-Chap01
That is enough to get me started.
To record a chapter, I punch and roll on the specific track for the chapter. I use DSP monitoring on my Focusrite interface rather than monitor via Cubase. Since I don't have to worry about latency, I leave all my processing switched on. I therefore here my track as it will be exported.
Once I have recorded a chapter, I set an end marker.
Optional - I select all the events on the chapter track, then go to Audio->Advanced->Delete Overlaps. When you punch and roll in Cubase, it layers up all your attempts and does not delete anything unless you press Undo before correcting your mistake. However, that can look quite messy when editing. Delete overlaps will remove any overlaps leaving it looking a little cleaner when you start to edit. However, it also deletes any events that are buried underneath. If you wish to keep these older takes for editing, don't do this step.
Next, I edit it and remove any mistakes, mouth noises, and so on. (See editing farther down the page).
I can then export it straight away. Since the output bus is a mono bus, I don't have to sum the stereo out and so I know that the resulting mono file is to the correct levels. Though I always double check using Second Opinion from Spoken Realms.
Once exported, I move the finish track to the Edited folder and turn on Locked and Mute.
I also open the Pool, create a virtual folder for my chapter (using the same naming convention again), and move all the associated files into it. It is not completely necessary this, but it keeps things organised.
Processing
Input Channel
Often, it is not necessary to have processing on the input channel, but I like to have a little. I think this is a hark back to analogue tape days where we always processed so that we could keep the level high without distortion.
In my case, I have two plugins.
Graphic Equaliser - I use this to roll off anything below 50hz and also to lower one specific frequency that is a problem in my booth. I use that even when recording guitar or flute.
Basic Compressor - this is set to a ratio of 2:1 with a threshold of -10 and an input gain of zero. This is just to catch some of my wilder moments and so I don't explode Cubase! But it is not enough to be terribly noticeable. I also have a little bit of makeup gain just so my record level is a little higher. Obviously, these settings are very much based around my particular setup.
Voice Bus
The voice bus is where I make everything sound nice, but it doesn't include the final mastering. What you put on your voice bus is up to you! This is what I have:
RX Voice De-Noise - This is optional if you need to loose some stray background noises. If your voice booth is good enough, you won't need something like this. Mine just gets rid of some low-level rumble from blown air central heating!
RX Mouth De-Click - what can I say? I am getting old and have fewer teeth. This doesn't get rid of everything, but it helps.
iZotope Nectar 3 - This is a multi-modular plugin which is very powerful. I have two modules in my current set up - EQ and De-Esser. I spent a long time getting the EQ right here and saved as a preset.
Vocal Rider - A very useful plugin from Waves. One of their best. This evens out voice levels without using limiting or compression. You should NEVER use limiting or compression to sort out uneven levels. In the old days, I would ride the voice track by hand to even it out BEFORE the compressor. This is effectively doing the same job as that. Recommended.
Mono Master
THis is where I finalize my levels and so forth. I have two plugins here.
RX De-Crackle - I almost never use this and it is just there if I need it. However, this should be left switched off except when exporting. It uses a lot of resources.
Ozone 9. This is another multi-modular plugin from iZotope. I have four modules activated:
Eq - which just tarts up the sound a little
Dynamics - this is adding a little compression to the deal.
Dynamic EQ - compression and mastering can mess with the EQ, so this compensates for that.
Maximizer - this sets a limit of -3.1db for ACX standard, and makes sure the final mix hits a target of -20 LUFS. (Note - most modern postproduction uses "Loudness" and LUFS rather than RMS.)
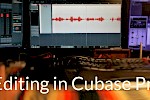
Editing
Editing in Cubase is a dream. Once you have Macros set up, it is incredibly fast. I am not going to tell you how to edit, but here are a couple of tips.
Since Cubase is non-destructive, it means that when you punch and roll, the previous takes are still there and not deleted. So if you wish to use the breath from the original take rather than the new take, you can. It is often better to do so!
I edit while reading the script (NOT LOOKING AT THE SCREEN) so I am proofing at the same time. If I need to re-record anything, I do so at the time and not leave it till later.
Remember, this is audio - the waveforms make editing easier, but they don't tell you anything about your performance and so on. Use your ears, not your eyes.
I have a few RX plugins to use as Direct Offline Processing. Mouth De-Click, De-Plosive, De-Ess and so on. I also have RX Connect. This allows me to select a range of audio and open it up in the full iZotope RX editor for repair. I can then "Send to Cubase" to insert it. I mostly use this for when I want to use Spectral Repair.
Remember that as you edit, you are hearing the final mastered version. So you can listen to the level of breaths as they will appear in the final mix after mastering. This makes decision making easier and more confident.
Conclusion
A template like this combined with the right plugins and macros makes audiobook production effortless, apart from the speaking bit!
Obviously, the setting and the plugins you use will depend on what you own and your environment, oh, and your voice. But the basic principle works for anyone.